Slow WiFi, constant buffering, or random disconnections can be incredibly frustrating—especially when your internet plan should be fast enough. One of the most overlooked fixes is learning how to change your WiFi channel. This simple tweak can dramatically improve your connection speed and stability, particularly in crowded areas where many networks overlap.
In this complete guide, you’ll learn what WiFi channels are, why they matter, and exactly how to change your WiFi channel for better performance.
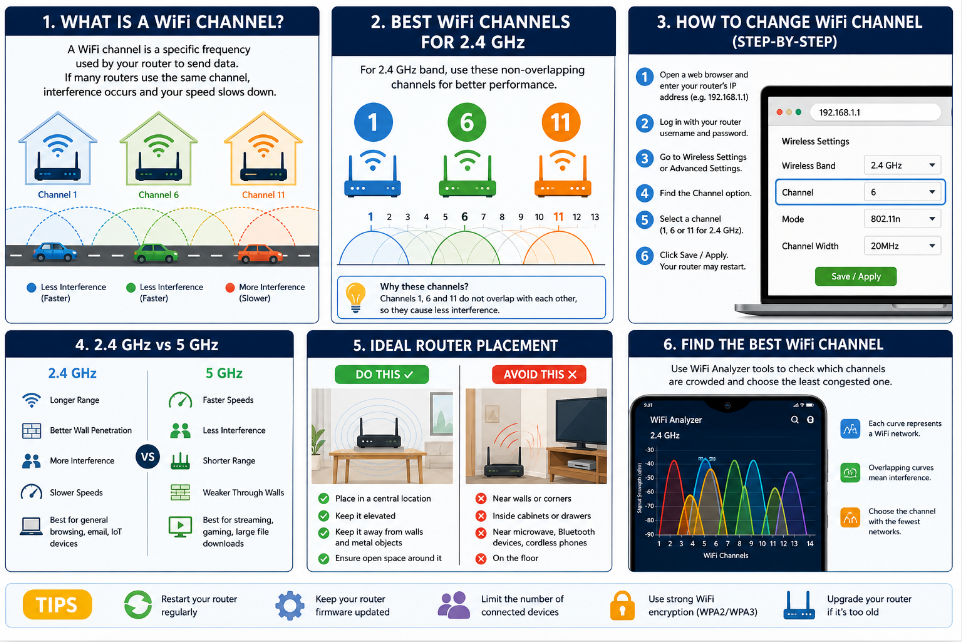
What Is a WiFi Channel?
A WiFi channel is a specific frequency range that your router uses to transmit data. Think of it like a lane on a highway. If too many routers are using the same “lane,” traffic slows down, causing interference and reduced speeds.
Most routers operate on two main frequency bands:
- 2.4 GHz – Longer range but more interference
- 5 GHz – Faster speeds but shorter range
Each band is divided into multiple channels, and choosing the right one can make a huge difference in your internet experience.
Why You Should Change Your WiFi Channel
If you live in an apartment, hostel, or densely populated area, chances are many nearby routers are using the same channel. This leads to:
- Slower internet speeds
- Frequent disconnections
- High latency (lag in gaming or video calls)
- Poor streaming quality
Changing your WiFi channel helps reduce interference and improves overall performance.
Best WiFi Channels to Use
For 2.4 GHz Band
The best channels are:
- Channel 1
- Channel 6
- Channel 11
These are non-overlapping channels, meaning they don’t interfere with each other.
For 5 GHz Band
There are many more channels available, and most routers automatically select a good one. However, manually choosing a less crowded channel can still improve performance.
How to Change WiFi Channel (Step-by-Step)
Follow these steps to change your WiFi channel easily:
Step 1: Access Your Router Settings
- Open a web browser
- Enter your router’s IP address in the address bar
(Common ones: 192.168.0.1 or 192.168.1.1) - Press Enter
Step 2: Log In to Your Router
- Enter your username and password
- Default credentials are often:
- Username: admin
- Password: admin or password
(You can find these on the back of your router if unsure.)
Step 3: Find Wireless Settings
- Look for options like:
- Wireless Settings
- WiFi Settings
- Advanced Settings
Step 4: Locate Channel Option
- Find the “Channel” setting
- It may be set to “Auto” by default
Step 5: Choose a New Channel
- For 2.4 GHz: select 1, 6, or 11
- For 5 GHz: choose a less crowded channel
Step 6: Save and Apply Changes
- Click “Save” or “Apply”
- Your router may restart
How to Find the Best WiFi Channel
Before changing channels, it’s smart to see which ones are crowded.
Use WiFi Analyzer Tools
You can use apps like:
- WiFi Analyzer (Android)
- NetSpot (Windows/Mac)
- Airport Utility (iPhone)
These tools show which channels nearby networks are using, helping you pick the least congested one.
2.4 GHz vs 5 GHz: Which Should You Use?
Choose 2.4 GHz if:
- You need longer range
- You’re far from the router
- Walls block signals
Choose 5 GHz if:
- You want faster speeds
- You’re close to the router
- You’re gaming or streaming
For best results, use both bands if your router supports dual-band.
Tips to Improve WiFi Performance
Changing the channel is powerful, but combining it with these tips gives even better results:
1. Place Your Router Properly
- Keep it in a central location
- Avoid walls and metal objects
- Elevate it off the floor
2. Restart Your Router Regularly
- Helps clear temporary issues
- Improves performance
3. Update Router Firmware
- Fixes bugs
- Enhances security and speed
4. Limit Connected Devices
- Too many devices slow down the network
5. Upgrade Your Router
- Older routers struggle with modern demands
Common Mistakes to Avoid
- Leaving channel on Auto forever – manual tuning can be better
- Using overlapping channels – causes more interference
- Ignoring 5 GHz band – often faster and less crowded
- Not testing performance after changes – always compare results
How Often Should You Change WiFi Channel?
You don’t need to change it frequently, but consider doing it when:
- Your internet suddenly becomes slow
- You move to a new place
- New networks appear nearby
- You experience frequent lag or drops
Final Thoughts
Learning how to change WiFi channel is one of the easiest and most effective ways to boost your internet performance. It takes just a few minutes but can significantly improve speed, reduce interference, and enhance your online experience.
If your WiFi has been acting up, don’t rush to upgrade your plan—start by optimizing your router settings. A simple channel switch might be all you need for smoother streaming, faster downloads, and lag-free browsing.